
A web-to-lead form is an essential component of marketing and sales automation. Its purpose is to capture data submitted by website visitors, such as contact information and product interest, and store it as a “Lead” record in a CRM product, in this case, Salesforce.
Before you start this tutorial, you’ll need a FormAssembly account (if you don’t have one yet, you can sign up for our free trial here) and a Salesforce Professional Edition (or above) account. Read on for a written tutorial or check out the video below for a walkthrough.
Part 1: Create your form
1. Open the template in the form builder, or build your own form
To simplify this tutorial, you can use this Salesforce Web-to-Lead template. If you would like to customize the template or build your own form from scratch, do so now.
2. Save and set up additional options
If you need to change/set up the display options (save & resume, preview response, or reCAPTCHA) or notifications options (thank you page redirects, auto-responders, and email notification), go ahead and do that now on the processing and notifications pages. You can also do this later if you find your needs for your form change.
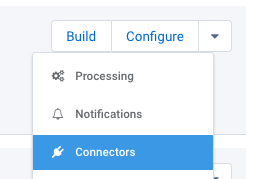
3. Navigate to the connector page
Navigate to the Connector page by selecting the Connector option on the left sidebar or by selecting “Connectors” under the “Configure” dropdown in the form list.
Part 2: Salesforce connector setup
1. Add and configure the Salesforce connector
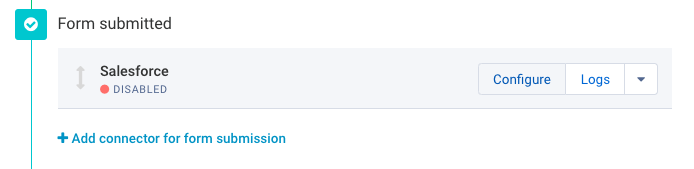
After you’ve finished customizing your web-to-lead form, add a Salesforce connector to the “Form Submitted” step, then click “Configure.” If you used the Salesforce web-to-lead template above, one will be set up for you already and you will simply need to review it and authenticate it.
2. Set Up Salesforce authentication for this connector
You can use Single Sign On to authenticate your Salesforce connector or you can also enter your Salesforce credentials manually. To do so, enter your Salesforce username. In the password input, enter your password and your security token. You can obtain a new security token by selecting “Setup” within Salesforce, then “Reset your security token.” Once you’ve entered this information, click “Check.” Next, choose the “Enable” radio button option.
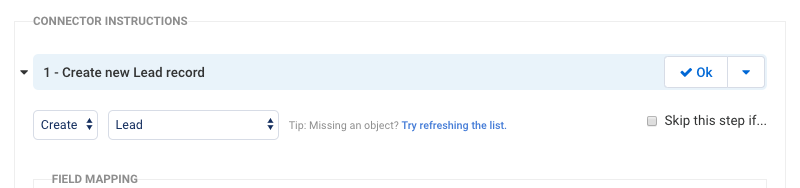
3. Select an object
Start by clicking “Select your first object” and then choose to create a lead using the options from the dropdown menus.
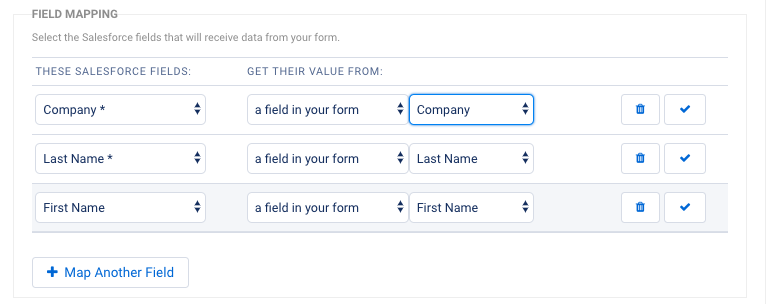
4. Map fields
Next, you’ll map your fields to specify how you want data sent to Salesforce into the Lead record we’ve selected to set up. Click “Map Another Field” to add additional fields.
5. Save your connector
Click the save button and you’re done setting up your Salesforce connector for this form.
6. Start using your form
Once you’ve finished setting up the connector, you’re ready to test your form and get it out to your customers. To do this, go to the “Publish” page, and click the link to go to your form. Fill out the form and click submit. Within a few seconds, you should see the new data in your Salesforce account.
You can also review the Salesforce Connector log to see how it mapped your data to Salesforce. Once you’ve confirmed that the form is properly connected to your Salesforce account, your form is ready to be used. Additional confirmation for your submission can be reviewed within FormAssembly by navigating to the Salesforce Connector log or by reviewing the response itself.
Web-to-lead is one of the most common uses of FormAssembly’s Salesforce integration, but you can also use FormAssembly to create other Salesforce forms that update or create almost any type of record in Salesforce.
What happens to the information after it’s captured on the web-to-lead form?
Once the information is captured, it is scanned against Salesforce for existing records, if none exist, the data is automatically stored as new lead records within Salesforce. If an existing record exists, any changes are updated and additional information is added to the existing record.
What additional actions can be taken with captured leads?
The lead submission can trigger workflows or other processes like automated email follow-up, internal notifications, and other custom actions that ensure continued engagement, nurturing and higher conversion rates.


