Author’s note: This tutorial requires knowledge of form creation, connector mapping, notification configuration as well as Salesforce email template creation and workflows. For code to work correctly, please replace any curly quotes in the text below with straight quotes.
FormAssembly Disclaimer: Please direct any questions regarding this tutorial to Franklin Joyce at [email protected] as FormAssembly does not provide Javascript support. Email does not support embedding forms or form functionality; this is not a best practice and may result in a form not displaying correctly or at all. Forms in emails may also be viewed as suspect by email providers and users.
Here’s a method to create a multiple-choice poll question in an email that you can use to update Salesforce.
Our multiple choice question will be represented by a series of buttons in our email. Those button URLs will redirect to our FormAssembly form. We’ll add querystring parameters to those URLs to pre-fill hidden fields on our FormAssembly form for our user’s name, answer, and Salesforce Record ID. We’ll add a bit of extra code so the form automatically submits itself.
Here’s how the user will experience your email poll. First, they’ll open your handsome email. Then they’ll vote, RSVP, voice their opinion or take action by choosing/clicking a button. This will redirect them to the notification message or page for your form thanking them and confirming their action.
→ Want more tutorials? Get the Salesforce + FormAssembly eBook
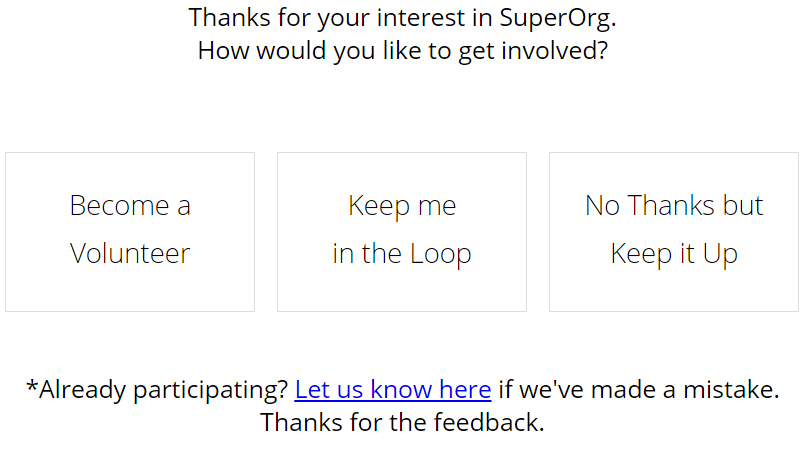
Let’s walk through an example – how about a poll for people who have expressed interest in your org? Here’s what our email will look like.
Step 1: create FormAssembly form
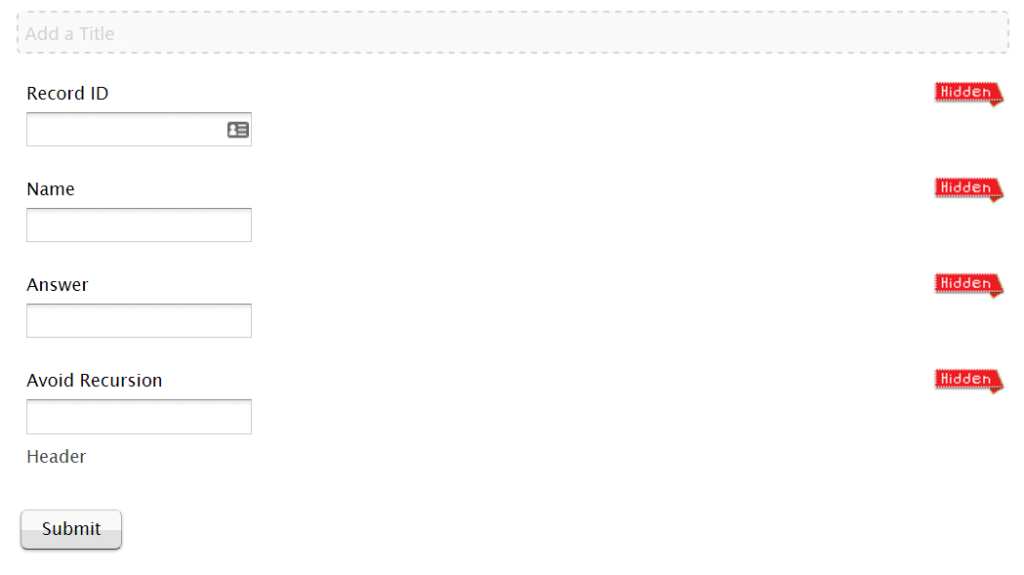
The only fields we need on the form are hidden fields for Salesforce Record ID, name and answer. Add one more hidden field called Avoid Recursion we’ll use to guarantee the automatic submission avoids getting into a recurring loop.
Let’s add one more element to the form so a blank screen isn’t displayed if FormAssembly requires a second to submit the form for you. Add a Text field and update “Click here to enter text” to something like Header. We’ll use JavaScript to replace this text with a colored box containing a processing message.
Your form should look like this:
Make sure the IDs for the hidden fields and text field you create match up in the custom code. You can find your field IDs by going to Form > Configuration > Notifications and scrolling down to Show the list of available aliases for this form
For our form our field IDs for pre-fill are
Record Id: tfa_1
Name: tfa_2
Answer: tfa_3
Avoid Recursion: tfa_4
Header: tfa_5
Now let’s get the custom code in place. Go to Properties > Custom Code. Here is some Javascript to paste in there. Make sure to update your field aliases.
The following custom message is momentarily displayed in a black header box while the form submits itself.

Update the message content, with the code below.
<style>
/* Hide the submit button and assistance link */
.wFormContainer .supportInfo, .wForm #tfa_0-A {
display: none;
}
</style><script type=”text/javascript”>//——————————————————————————–
// Onload Automatic Form Submission Code
//——————————————————————————–
window.addEventListener(“load”, function(){
var recordId = “tfa_1”;
var nameId = “tfa_2”;
var avoidId = “tfa_4”;
var headerId = “tfa_5”;// Get details for display passed in from URL parameter
var name = document.getElementById(nameId).value;// Display details on screen while waiting for form to self-submit
// Customize to display whatever message/info you’d like the user to see for a moment while the form submits itself
document.getElementById(headerId + ‘-HTML’).innerHTML = “<div style=’width:100%; margin-top:10%; padding:0px 12px 20px 12px; background-color:black; overflow:auto; box-sizing: border-box; text-align:center;’><h1 style=’margin-bottom:0px; border:0; color:white;’>Thanks ” + name + ” for adding your opinion to the poll</h1></div>”;// Check that there is pre-fill data
var prefillData = document.getElementById(recordId).value;// Occasionally we see multiple submissions so we add a blank box and fill it after we submit
var avoidRecursion = document.getElementById(avoidId).value;// We don’t want the from to self-submit if no information is passed in
if(prefillData != “” && avoidRecursion == “”) {
document.getElementById(avoidId).value =”TRUE”;
document.getElementById(“tfa_0”).submit();
}
});
</script>
Step 2: build your email button URLs
The buttons will link and pass info into your form. The URLs for your button links would be:
https://www.tfaforms.com/ + Six digit form ID + ?tfa_1= + SalesForce Record ID + &tfa_2= + Name + tfa_3= + Answer
In our case
Six digit form ID = 123456
SalesForce Record ID = 003123456789012
Name = Franklin
Answer = <0 or 1 – to represent choice 1 or 2
Put it all together
Button 0 URL
https://www.tfaforms.com/123456?tfa_1=003123456789012&tfa_2=Franklin&tfa_3=Option1
Button 1 URL
https://www.tfaforms.com/123456?tfa_1=003123456789012&tfa_2=Franklin&tfa_3=Option2
Notes
- Spaces or special characters in your URL parameters will break the URL. Use the Substitute function in your formulas to remove any special characters. The usual culprits are space, &, @ in names.. These can be removed with SUBSTITUTE( SUBSTITUTE( SUBSTITUTE(YourFieldAPI, ” “, “%20″) ,”&”,”%26″),”@”,”%40″)
- Enterprise users can avoid passing IDs and do look-ups
Step 3: build your email template in Salesforce
I’ll just focus on the buttons here. Thanks to Campaign Monitor and their Bulletproof Email Button Tool for button html that works in Outlook and Non-Outlook email clients.
For Buttons that look like this:

We’ll use the following code for a three button layout. You’ll need to make adjustments if you want more or fewer buttons. You’ll see the URLs and the button labels you’ll modify.
<table style=”width:600px;”>
<tr>
<td width=”10″> </td>
<td width=”180px”>
<!–[if mso]>
<v:rect xmlns:v=”urn:schemas-microsoft-com:vml” xmlns:w=”urn:schemas-microsoft-com:office:word” href=”https://www.tfaforms.com/123456?tfa_1=003123456789012&tfa_2=Franklin&tfa_3=Option1” style=”height:95px;width:180px;padding-top:20px;” strokecolor=”#dddedf” fillcolor=”#ffffff”>
<w:anchorlock/>
<center style=”color:#000001;font-family:font-family: ‘Open Sans’, sans-serif;font-weight: 300;font-size:24px;”>Become a<br/>Volunteer</center>
</v:rect>
<![endif]–>
<a href=”https://www.tfaforms.com/123456?tfa_1=003123456789012&tfa_2=Franklin&tfa_3=Option1” style=”background-color:#ffffff; border:1px solid #dddedf; color:#000001; display:inline-block; font-family: ‘Open Sans’, sans-serif; font-weight: 300; font-size:20px; line-height:35px; text-align:center; text-decoration:none; height:95px; width:180px; padding-top:20px; -webkit-text-size-adjust:none; mso-hide:all;”>Become a<br/>Volunteer</a>
</td>
<td width=”15″> </td>
<td width=”180″>
<!–[if mso]>
<v:rect xmlns:v=”urn:schemas-microsoft-com:vml” xmlns:w=”urn:schemas-microsoft-com:office:word” href=”https://www.tfaforms.com/123456?tfa_1=003123456789012&tfa_2=Franklin&tfa_3=Option2” style=”height:95px;width:180px;padding-top:20px;” strokecolor=”#dddedf” fillcolor=”#ffffff”>
<w:anchorlock/>
<center style=”color:#000001;font-family:font-family: ‘Open Sans’, sans-serif;font-weight: 300;font-size:20px;”>Keep me<br/>in the Loop</center>
</v:rect>
<![endif]–>
<a href=”https://www.tfaforms.com/123456?tfa_1=003123456789012&tfa_2=Franklin&tfa_3=Option2” style=”background-color:#ffffff; border:1px solid #dddedf; color:#000001; display:inline-block; font-family: ‘Open Sans’, sans-serif; font-weight: 300; font-size:20px; line-height:35px; text-align:center; text-decoration:none; height:95px; width:180px; padding-top:20px; -webkit-text-size-adjust:none; mso-hide:all;”>Keep me<br/>in the Loop</a>
</td>
<td width=”15″> </td>
<td width=”180px”>
<!–[if mso]>
<v:rect xmlns:v=”urn:schemas-microsoft-com:vml” xmlns:w=”urn:schemas-microsoft-com:office:word” href=”https://www.tfaforms.com/123456?tfa_1=003123456789012&tfa_2=Franklin&tfa_3=Option3” style=”height:95px;width:180px;padding-top:20px;” strokecolor=”#dddedf” fillcolor=”#ffffff”>
<w:anchorlock/>
<center style=”color:#000001;font-family:font-family: ‘Open Sans’, sans-serif;font-weight: 300;font-size:24px;”>No Thanks but<br/>Keep it Up</center>
</v:rect>
<![endif]–>
<a href=”https://www.tfaforms.com/123456?tfa_1=003123456789012&tfa_2=Franklin&tfa_3=Option3” style=”background-color:#ffffff; border:1px solid #dddedf; color:#000001; display:inline-block; font-family: ‘Open Sans’, sans-serif; font-weight: 300; font-size:20px; line-height:35px; text-align:center; text-decoration:none; height:95px; width:180px; padding-top:20px; -webkit-text-size-adjust:none; mso-hide:all;”>No Thanks but<br/>Keep it Up</a>
</td>
<td width=”10″> </td>
</tr>
</table>
You’ll notice that there appears to be an extra set of your buttons commented out by <!– if mso>. If mso is If Microsoft Outlook. The Non-Outlook buttons don’t get displayed by Non-Outlook mail clients and the outlook button code is hidden to Non-Outlook email clients. Make sure to pay special attention to including your merge fields for both the Outlook and Non-Outlook browsers.
Step 4: set up your connector
Lastly, use your connector to map your answer to the appropriate Salesforce Contact field matching to the Contact ID. Here is a sample that matches to a Volunteers for SalesForce Volunteer Hour and updates a Volunteer Rating field.

Step 5: send out your poll and test it
Trigger SalesForce to send email the Template with buttons you built in step 3. When you click your buttons, you should be redirected to your form where you only see your display message. This should only display a moment before you see your from response -indicating your form was submitted (automatically). Check the corresponding record in SalesForce to confirm the mapping and connector are setup correctly.
You can create a poll and email it for any of these use cases
Email polls have a variety of different uses in business, and they offer customers a simple, hassle-free opportunity to give their input without having to enter any contact information or visit a different page to complete a form.
Quick customer service evaluation
An email poll can quickly gauge how happy your customers are with the level of support they’re getting. Place the buttons in your email signature and gather feedback in an unobtrusive way.
New feature poll
Not sure which new features or service offerings you should prioritize? Ask your customers in a simple, two-button email poll that shows two different options of new features you could develop.
Order satisfaction survey
In an order follow-up email, get your clients’ feedback on their order experience while it’s still fresh in their minds.
These are just a few examples of email polls in forms. Some of the specific use cases from my clients include:
- Donor interest poll
- Requesting/declining to visit a real estate property
- Volunteer experience rating
- Mix use buttons that redirect to different forms or webpages
———————–
For further assistance on the tutorial above, reach out to Franklin Joyce at [email protected].
If you liked this how-to post, suggest future topics in the comments below or on Twitter. Don’t have a FormAssembly account? Sign up for one here.
Author Bio
Franklin Joyce is a SalesForce Consultant/Developer helping Social Change Organizations create mobile friendly program tools and community portals that engage and inspire. See more great projects at www.Electricbaby.com.