Adding a logo to your digital form can help make it feel like an integral part of your website as well as extend your brand, whether it’s for a personal, organization, or business site. We get many requests from users wanting to add a logo, and several of you even requested it via the Theme Editor Survey. With the Theme Editor’s launch, adding a logo has become simpler than ever. In this tutorial, I will walk you through adding a logo to your form. First, we’ll look at doing this from within the Theme Editor, then we’ll do it the old-fashioned CSS way.
Use the Theme Editor to add your logo
Before we get started, open a new digital form (either start a new one to practice on or use an existing digital form you’d like to update) and then go into the Theme Editor. Go to the Advanced Editing panel, and we’re ready to start.
Upload your logo
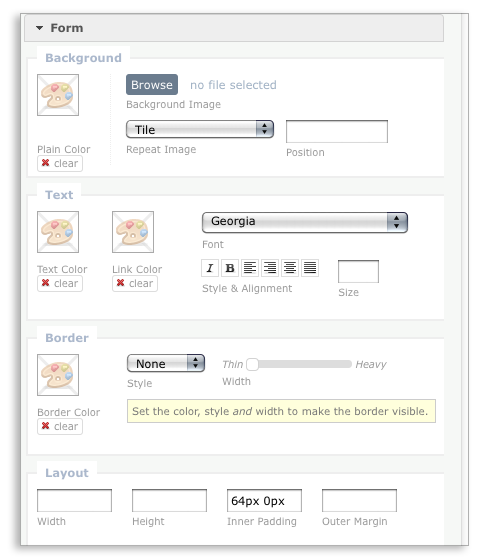
Open the Web Page Background panel. Click “Browse” and find, then select your logo. Once you’ve located it, click “Open” or “Ok.” You’ll see you logo tiled (repeated horizontally and vertically) across the background of your form.
Note: Before you upload your logo image, you may want to resize. The exact dimensions are up to you, but a height of 60px is a good place to start for logos and company names.
Position your logo
Chances are, having your logo tiled across the page is a little overwhelming and not the look you really want. Since logos generally only appear once on a page, select “Does not Repeat” from the dropdown menu in the panel. Your logo will now appear once, in the top-left corner of your form.
If this is where you would like the logo to stay, then you’re all set. However, if you would like to place the logo somewhere else, you’ll need to position it using the “Position” input. You can position your logo in a few ways. First, you can use pixels. If you enter 50px 10px, the image will appear 50 pixels from the left side of the page and 10 pixels from the top. This is good for getting your logo in an exact, specific position.
If you don’t need to be specific about the location of the logo, you can use keywords to define the position of the logo. The keywords are:
- top left
- top center
- top right
- center left
- center center
- center right
- bottom left
- bottom center
- bottom right
Add padding to your digital form
You may notice that your logo and your form text or title are overlapping. To fix this, open the online form panel, and locate the “Padding” input. There, set enter the height (in pixels) of your image, followed by 0px. This will set the top and bottom padding to 0px. For more information on positioning a background image with the Theme Editor, check out theme editor documentation.
Once you have your logo where you want it, you’re done! Don’t forget to style the rest of your form.
Use CSS to add your logo to
If you already have some custom CSS or want an extra level of control when adding your logo to a form, add CSS to your form in the Custom Code section. For more information on the Custom Code block, see custom css documentation. To start, make sure you’ve uploaded your logo to the web and know its URL. Then, open your form in Form Builder (no need to go to the Theme Editor here).
Click your form’s title, then open the Advanced panel. There, you’ll see the Custom Code block. Paste the following CSS into that text area:
<style type="text/css">
.wFormContainer{
background: url("yourURLHere") no-repeat;
background-position: xpx ypx;
padding-top: XXpx;
}
</style>
- Replace “yourURLHere” with the URL of your logo, but make sure to keep the quotes.
- You can modify the background-position attribute using the same strategies as in the Theme Editor. Here, it is set up for pixels, but you can use the keywords as well.
- Set the padding equal to the height of the image, so that the image and the form’s title don’t overlap.
All of these methods are effective at adding a logo to your digital form, but you may need to experiment to find the one that suits your needs best. If you haven’t already, be sure to claim your 14-day trial to follow along with this tutorial, no credit card required.


