Are your employee onboarding processes confusing and inefficient? Training dashboards can help by providing a user-friendly record of onboarding progress that updates in real-time. With FormAssembly, you can use web forms, calculations, redirects, and Salesforce connectors to create your own no code dashboard.
In this blog, we’ll talk about how to go about creating a training dashboard form similar to the one that FormAssembly uses for our own employee onboarding. The main difference between this example form and FormAssembly’s actual usage is that this example form contains no custom code. Yes — it’s possible to create complex form use cases without any code or formulas.
We’ll break down exactly how that’s possible in this blog and share more dashboard use case ideas from FormAssembly customers.
Why Create a Training Dashboard Form?
When a new employee joins your team, they may need to complete a variety of different documents, from tax information to product training. A training dashboard is a form that contains a list of additional forms that the respondent, a new employee in this case, needs to fill out to complete their onboarding. The dashboard can act as a checklist for any pending to-dos.
This use case can also easily be modified to serve as an onboarding dashboard for other businesses, such as marketing agencies, financial planners, and more, where the business needs to collect certain information from their client up front.
How the Dashboard Works
When the training dashboard is fully built, it’ll work like so:
After creating a Salesforce Trainee File Object for your new employee that contains their basic information (we’ll cover this later), you’ll direct them to their training dashboard with a prefilled link.
The training dashboard will show a list of all the forms they need to complete as part of onboarding.
As they select each option and hit submit, the form will redirect them to another form to fill out, prefilling their email address along the way.
Each time a form is filled out, it will update in Salesforce and in the employee dashboard.
How to Build a No Code Dashboard
To follow along with this tutorial, you’ll need access to the Salesforce Submit and Prefill connectors, which means you’ll need to be on a FormAssembly Premier plan or higher. You can start a FormAssembly Premier trial here if you haven’t already.
Now, here’s how to build the form:
Trainee Files Object (Salesforce)
First, you’ll need to create a Trainee Files Object in Salesforce to hold the new employee’s information as well as checkboxes denoting which forms they’ve filled out in their onboarding journey.
You’ll also need to add additional Trainee Form Objects linked to the Trainee Files Object with a master-detail relationship, which describes a relationship in Salesforce where there can be one parent and multiple children. If the parent object is deleted, this automatically deletes all the child objects, making offboarding easier if an employee leaves.
Training Dashboard Form
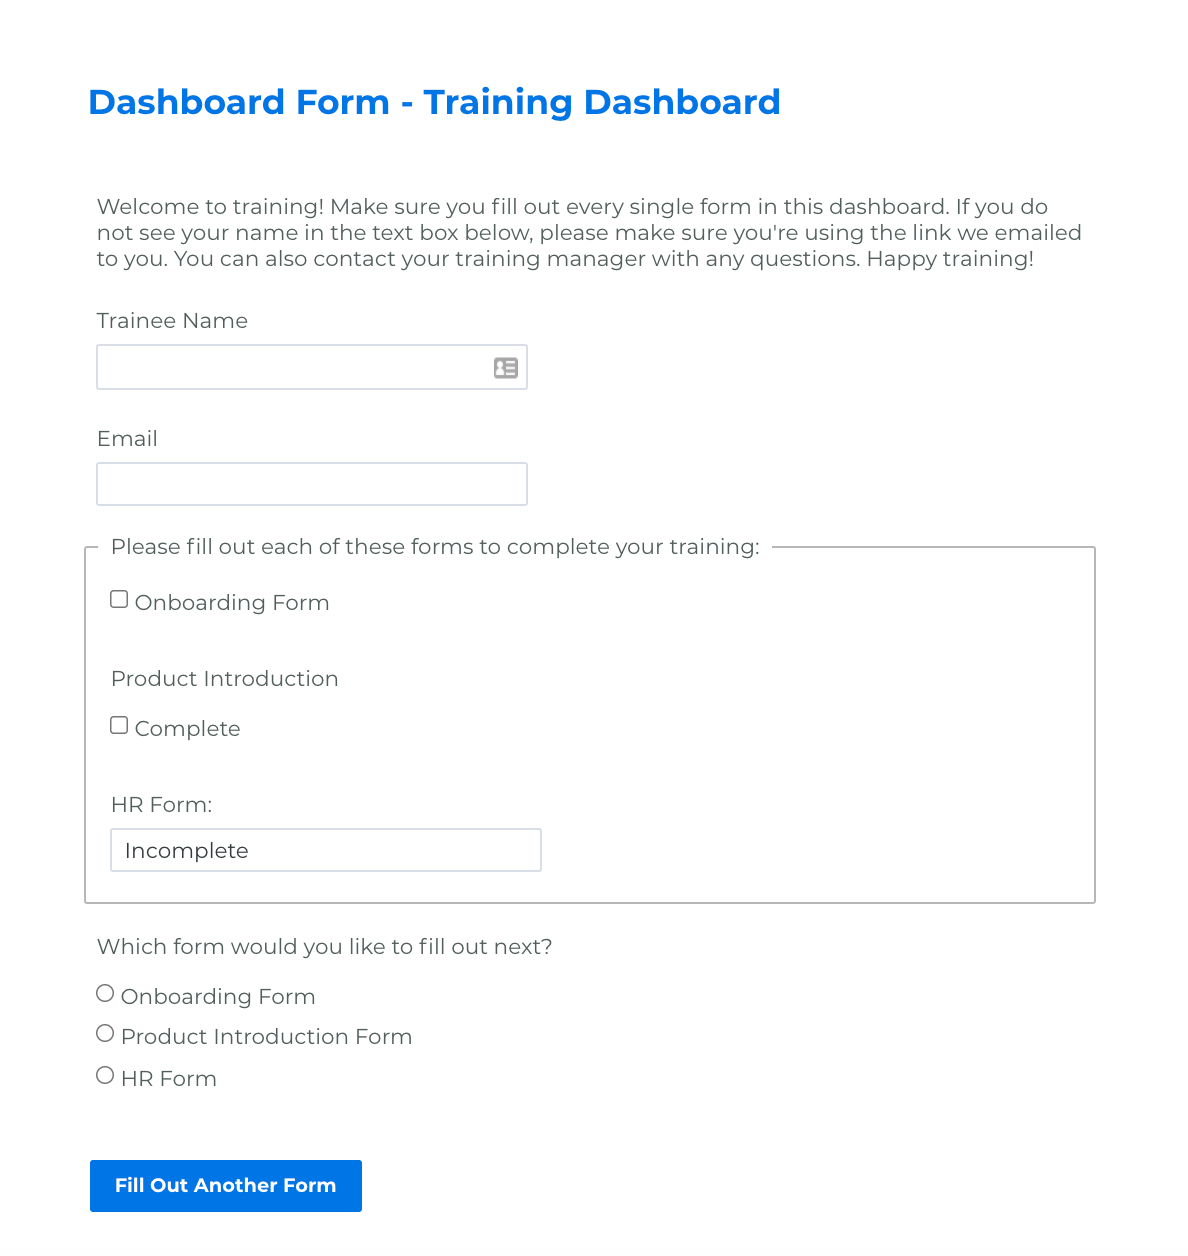
The training dashboard form contains general information about the employee and a summary of the forms they need to complete. It allows the employee to select an incomplete form and submit the dashboard to travel to that form.

Here are a few tips and tricks for making this form look great and work correctly.
- List the forms that need to be filled out: To list the onboarding forms, you can use several methods. One we show in this example form is making a checkbox for each option, setting the field label to the name of the form and making the checkbox text “Complete.” You could also use text fields that have a default value of “Incomplete” unless there’s other information to put in that field. While it is possible to use checkboxes with the name of the form as the checkbox text and the label removed, this can cause difficulty later on when you need to identify a field by its label. You may want to set the checkbox fields to be no-overwrite fields so that only filling out the necessary forms will update them.
- Use the submit button: You can use custom code to hide the submit button if you like, but since this tutorial is entirely no-code, we opted to use the submit button to send the user to a selected form instead. Here’s how that works.
- Create a radio button field with an option for each form that needs to be filled out.
- Make it a variable.
- Give each option the value of the link of the form in question. Specifically, the beginning of a prefill through the URL link.
- Create another hidden text field named “hidden field” that takes the value selected in the radio button.
- Create a redirect link that pulls in the hidden link field + the respondent’s email, creating a full prefill link.

Training Dashboard Form Salesforce Connector
Once you’ve set up the Training Dashboard Form, you’ll move on to setting up the Salesforce Connectors, which are relatively simple for this particular form.

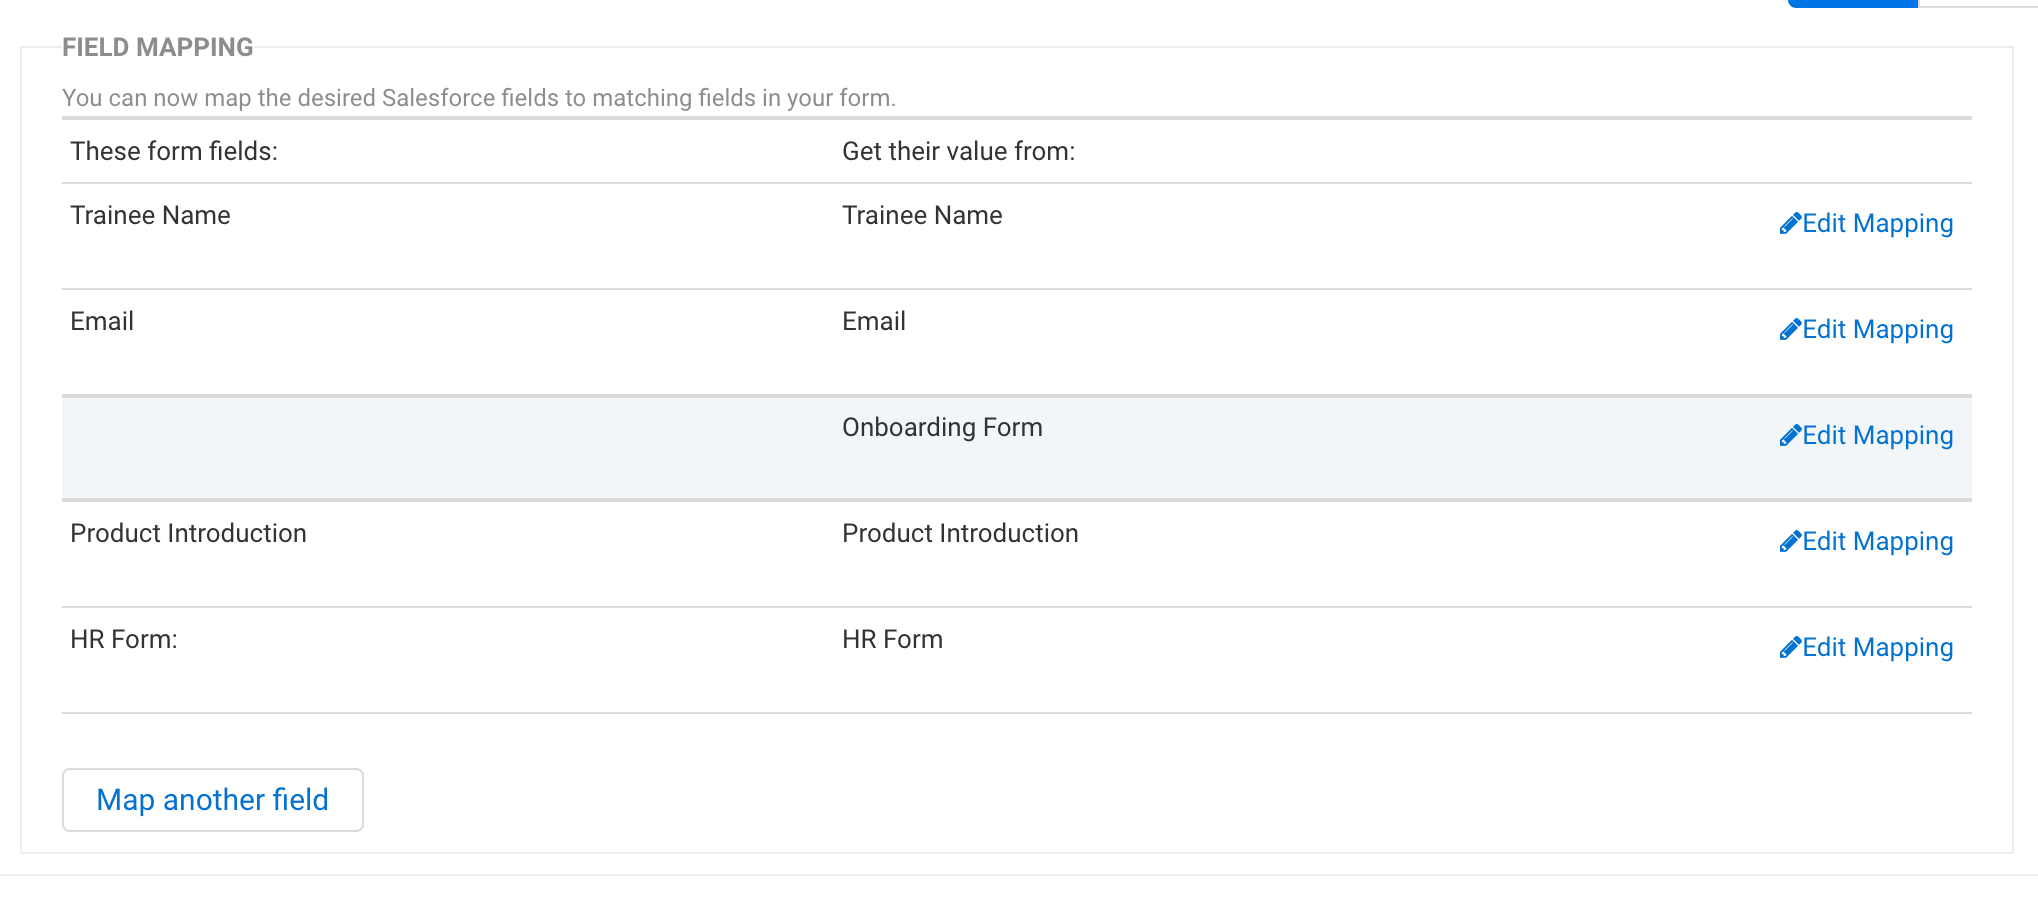
Navigate to the Connectors page and add a Salesforce Prefill Connector. Configure it to prefill your form from the Trainee File Object, and base the lookup on email. Next, map the fields in your form to fields in Salesforce:
- Trainee Name
- Onboarding form options (depending on whether you used checkboxes or text fields to set up the onboarding form options, you’ll either map to a Salesforce checkbox or a text field)

Individual Training Forms
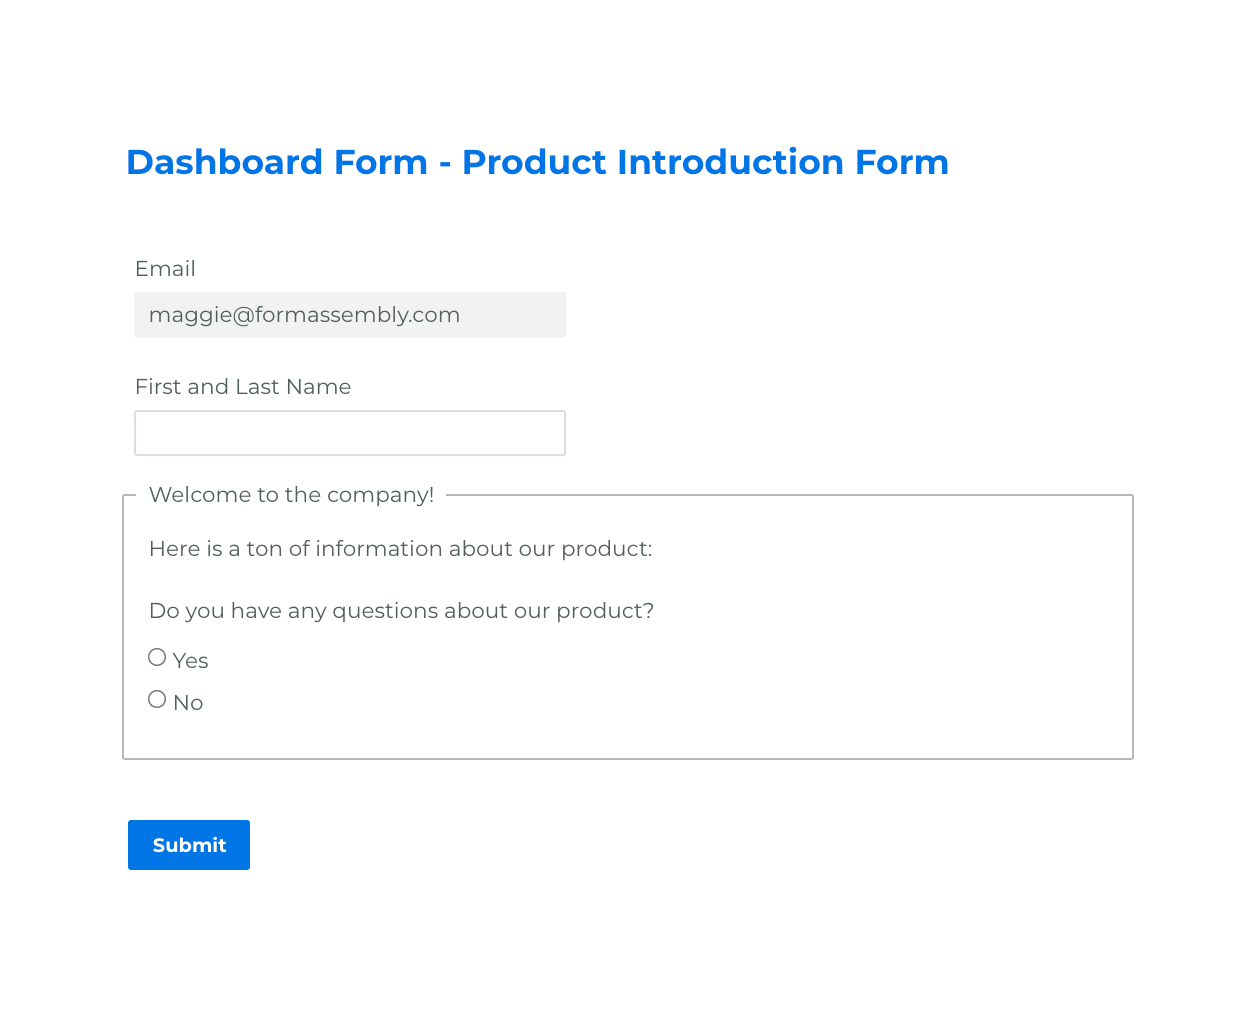
The individual training forms will vary based on the information you need to collect, but we’ll highlight a few important points about them before moving on to their connector.
- Email prefill: When each onboarding form is loaded from the dashboard, it’ll be prefilled with the email of the employee in question. The individual training forms use URL prefilling, so you won’t need a Prefill Connector on these forms. This will help the Salesforce connector link the form responses back to that employee upon submit.
- Redirect on submit: When the form is submitted, it will redirect users back to the training dashboard. This will allow them to easily complete any other pending onboarding forms.

Individual Training Forms Salesforce Connector
The individual training form connector is the mechanism that updates the employee’s Salesforce record, and in turn, the training dashboard. Here’s how it works.
- Set up only a Salesforce Submit Connector.
- Configure the Connector to update the Trainee Files Object, which the connector will locate by using the email prefilled into the form.
- Once the Connector locates the right object, it will “check” the correct field in Salesforce, indicating that that form has been completed.
- The connector also needs to be set up to create a new trainee form record with the name of the form and all the details of the response.
Wrapping It Up
When you’re done creating this dashboard, be sure to test it before using! The best way to test this form is to create a test Trainee Files Object in Salesforce, prefill your form with the information from that object, and fill out each form. You’ll be able to see if your form settings and connectors work correctly to route people the right forms and update the main dashboard as they fill out onboarding materials.
No Code Dashboard Example : Case Study Time
To get you thinking about other ways you can use FormAssembly to create dashboards, we pulled a real-life example from our own VIP group.
Student Data Dashboard
FormAssembly Champion: Cassie Supilowski, OneGoal
“This year we rolled out a data dashboard for our students to give them better access to their own data and see what information needed updating. The dashboard itself is accessed from our Single Sign On or a unique link sent from Salesforce, and the Contact casesafe ID is used to prefill the data. We tweaked the code from this blog post to include links that pass in either the Contact casesafe ID or the email address into other prefilled forms that are linked in the relevant sections of the dashboard. We also leveraged some simple code to hide the submit button and repeatable section links. Conditional fields helped us show or hide sections based on the current month and region of the student. I am by no means an expert in writing code, but with the resources available and support from users in the Power of Us Hub FormAssembly group, I was able to pretty easily pull together a dashboard form to meet our needs!”


Did you like this tutorial? Check out another helpful walkthrough: “Tutorial: Connect Your FormAssembly Forms With Slack”.


