
Have you used Workflow yet? Whether you’re already deep into FormAssembly’s new process-building solution or you haven’t found the time to try it out, we have three game-changing features to explore in this new blog series. In this article, we’ll be discussing the time-saving capabilities of form-to-form prefilling.
If you’d like a quick overview of the Workflow Builder before you dive into individual features, you can visit our Workflow Setup documentation.
What is form-to-form prefilling?
We’ve all been there—being required to fill out the same information over and over again is tiresome and time-consuming. Luckily, prefill abilities are built into Workflow. This means you can prefill the forms in your workflow with data pulled from Salesforce, and you can also use the form-to-form prefilling features within a Workflow to prevent your respondents from needing to enter the same data multiple times. Not only can you prefill text fields, but you can also prefill hidden fields, radio buttons, and more.
Beyond form-to-form prefiling, you can leverage data submitted through your workflow forms at multiple other points and locations in your workflow, including autoresponders, thank you pages, and thank you messages. Overall, being able to prefill forms within workflows drastically improves the user experience for respondents and makes life easier for staff.
So let’s get started with form-to-form prefilling! First, you will need to build a workflow that includes two or more forms to begin the process of form-to-form prefilling. The Prefill tab will not show up until you select your second form and will not be available on the first form since there are not any previous forms to pull from.
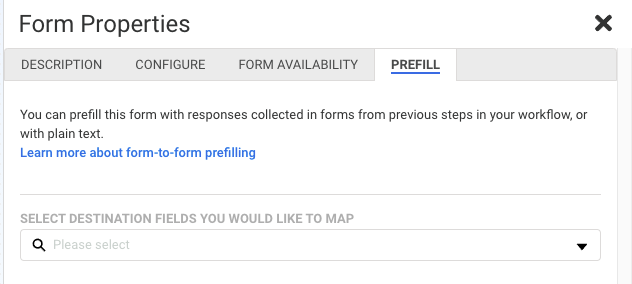
You will want to select your destination fields. This dropdown menu displays a list of all of the fields within the destination form (the form you’re currently configuring).
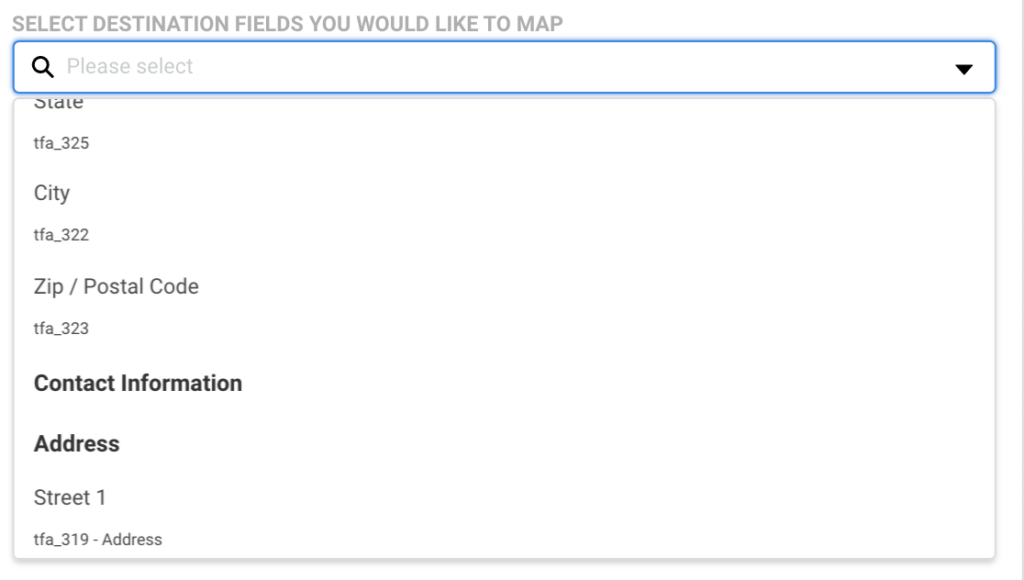
The listed options will display in the following format:
- Primary text: [field name]
Secondary text: [field alias] – [section title]
You can also use the type-ahead input to narrow down the list of options by either field name or alias. If you add multiple destination fields, the field mapping rows will appear in the order listed in the dropdown menu, regardless of the order in which they were added.

Each row in the field mapping table will consist of two columns. The left column displays the destination field names, while the right column allows you to define the source type and selection. There are two main source types that we’ll go into detail about below: Form Field and Formula source type.
Form field
Selecting Form Field for your source type will cause a type-ahead dropdown field to appear. This dropdown provides a list of all of the available fields where you can source the prefill information from. You can only prefill from forms that precede the form you are prefilling in the workflow. This means that you cannot prefill information from a later step. You can select any of these fields in order to pass the value from the source field into the destination field on the current form. Please note that there is no validation in place that would check to make sure that the expected input of the destination field matches the expected input of the selected source field. We strongly recommend testing your prefill setup prior to going live with your workflow.
Formula
The Formula Editor in the Prefill Tab has some additional aliases when compared to the form-specific editor. Namely, you can now select fields and aliases from all previous forms when building your formulas. Selecting these previous forms’ fields and aliases in the Formula Editor will create a “super-alias”, an alias that works across multiple forms and steps. Super-aliases have the following format:
%%[workflow step #]![field alias]%%
If you are not yet familiar with the Formula Editor, then you can learn more about using the Formula Editor to create formulas here first.
To learn more about Multiple-choice Destination Field and Repeatable Field Prefilling in Workflow, you can visit our Workflow – Prefill Tab documentation.
Form field vs. formula source type
The key difference between using a form field source type and a formula source type is that formula source allows you to make your forms more dynamic. Using a form field source type is fitting when you simply want to prefill information gathered in a previous step. With a formula source type, you can create formulas to dynamically prefill fields in a form.
One example of a formula is this:
@IF(%%step_7!tfa_5%%=””,”test@formassemblycom“,%%step_7!tfa_5%%)
You can create a formula by using the Formula Editor by clicking the small blue f icon here:
Here’s how this formula would look in the Formula Editor:
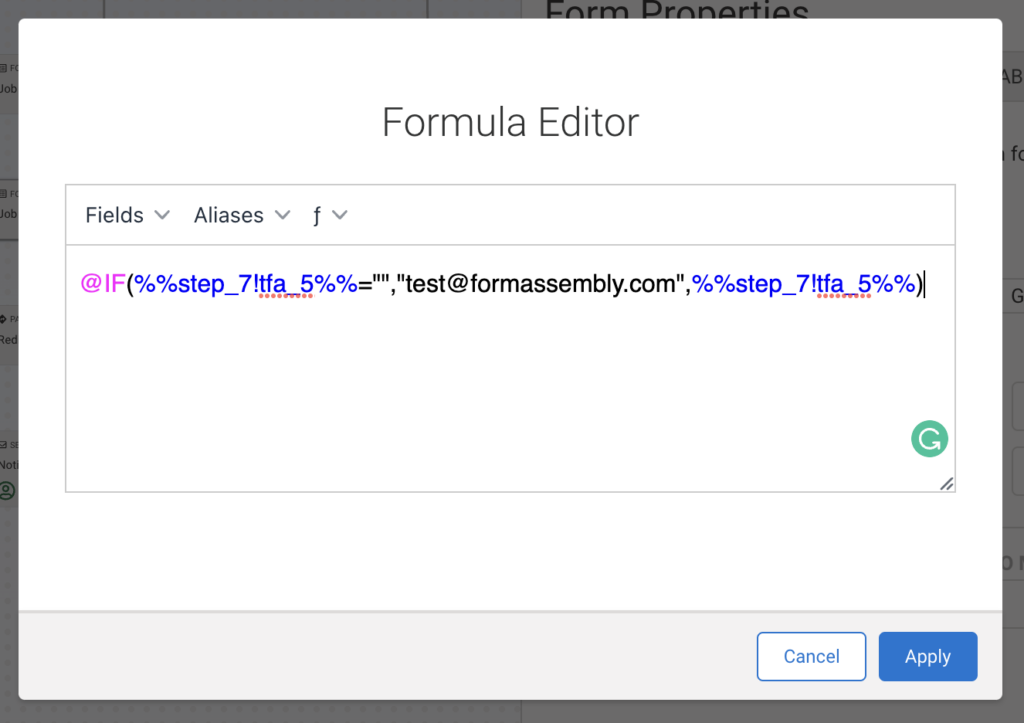
Using this formula in a prefilling configuration would allow your form to prefill alternate values if a certain field was empty.
Next steps
Now that you’ve learned about form-to-form prefilling, it’s time to put it to use in your own workflows. If you’re not already a FormAssembly customer, explore how Workflow could benefit your organization, then reach out to us for a demo.