You want to make the form-filling experience as seamless as possible for your audience. Prefilling forms with existing Salesforce data is a great way to make the process fast and user-friendly. But when that data is sensitive, it’s important to ensure that only the right person can view it.
With FormAssembly’s new Salesforce Workflow Connector, you can build verification processes directly into your workflow. The options available to you within the connector allow you to add layers of security to your workflows. This puts you in control of authenticating users and reducing the risk of exposing personal information.
A Smarter Way to Prefill with Security in Mind
The new Workflow Connector takes advantage of the latest Salesforce integration features in FormAssembly, including:
- Workflow-scoped parameters to securely pass data between steps
- “Lookup a Record” actions for advanced prefill logic
- Preconditions to control when actions run, based on verified inputs
- Improved performance and fewer API calls using Salesforce’s Composite API
Step-by-Step Tutorial: Secure Two-Step Prefill
Here’s how to create a two-step prefill process using the Salesforce Workflow Connector.
Step 1: Create Your First Form (Verification Form)
Design a basic form that collects at least two unique identifiers to confirm the user’s identity. Examples include:
- Email address + phone number
- Email address + date of birth
- Email address + employee ID or student number
Requiring an option such as an employee ID or student number, which is typically more unique to a user and harder for a bad actor to guess, is a more secure option. Requiring multiple “unique” field options like these adds additional layers of security to your form.
Step 2: Create Your Second Form (Prefilled Registration Form)
This is the main form that will display personalized, prefilled data, such as contact information, application details, or other Salesforce records.
Step 3: Build a New Workflow
- Navigate to the Workflow Builder and add both forms as steps in your workflow.
- Between the two forms, click the “+” icon and add a Salesforce Connector step.

Step 4: Configure the Salesforce Connector
- From the Properties Panel, choose “Configure Connector.”
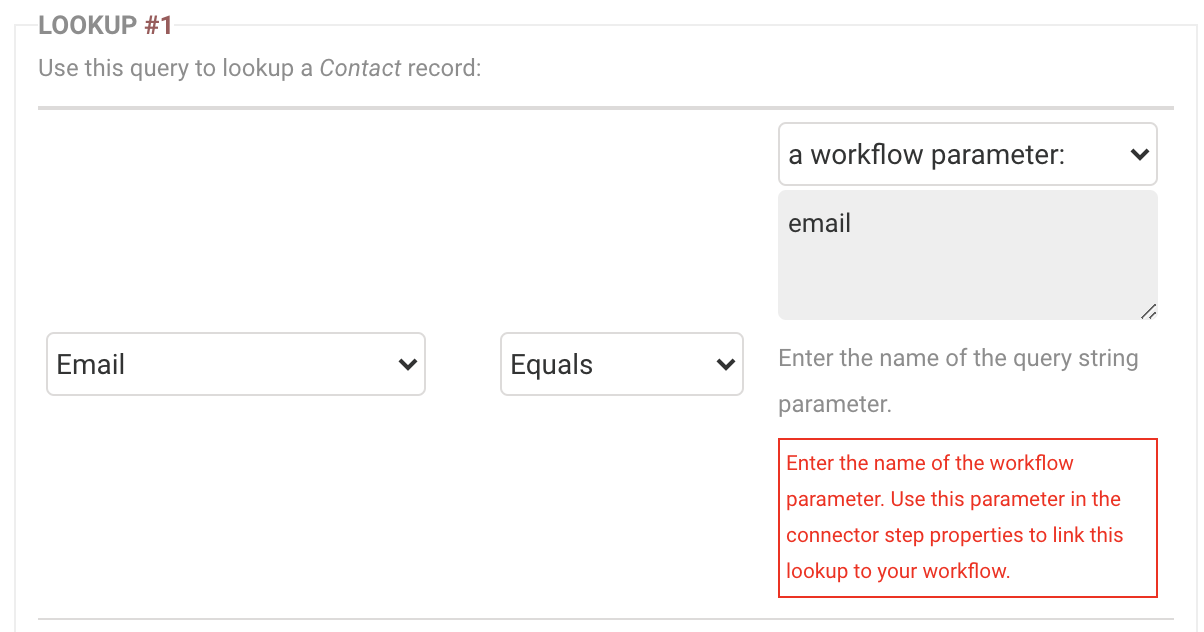
- Add a “Lookup a Record” action:
- Set the object to “Contact” (or the object relevant to your use case).
- Match based on the parameters from the first form (e.g., email and employee ID).
- Use advanced matching logic if needed (e.g., both fields must match a single record).
- Set the object to “Contact” (or the object relevant to your use case).
- Add a Prefill Form Fields action:
- Map fields from the found record to the fields in your second form.
- Ensure sensitive data is only displayed when a valid match is found.
- Map fields from the found record to the fields in your second form.
Step 5: Add Preconditions
Use preconditions on your Lookup action or form transition to ensure that both identifier fields are provided before proceeding.
Example precondition: Only run the Lookup if the email and phone number fields are both populated.
Note: Any format or validation requirements should be handled on the form itself, as preconditions can only check whether fields are equal/not equal, similar, or blank/not blank.
Step 6: Set Workflow Parameters
- From the Properties Panel of your Salesforce Connector, assign the email and phone values from Form 1 as Workflow Parameters.
- Reference these parameters in your Lookup and Mapping steps.
Step 7: Test Your Workflow
- Fill out the first form using test data that exists in your Salesforce org.
- Ensure the second form displays correctly prefilled data only when a valid match is found.
- Test for mismatches or missing data to confirm that no prefill occurs without verified input.
Final Thoughts
FormAssembly’s new Salesforce Workflow Connector makes it easier to build advanced, dynamic data flows – no hidden fields or complex formulas required. With tools like Lookup Actions, preconditions, and workflow parameters, you can create a secure user experience without compromising ease of use.
Want to explore more advanced logic and automation? Check out our Knowledge Base or book a demo to see your use case in action.